This project was for me to learn all cool techniques available on YouTube all at a time so it was a pretty busy project!
Project Summary
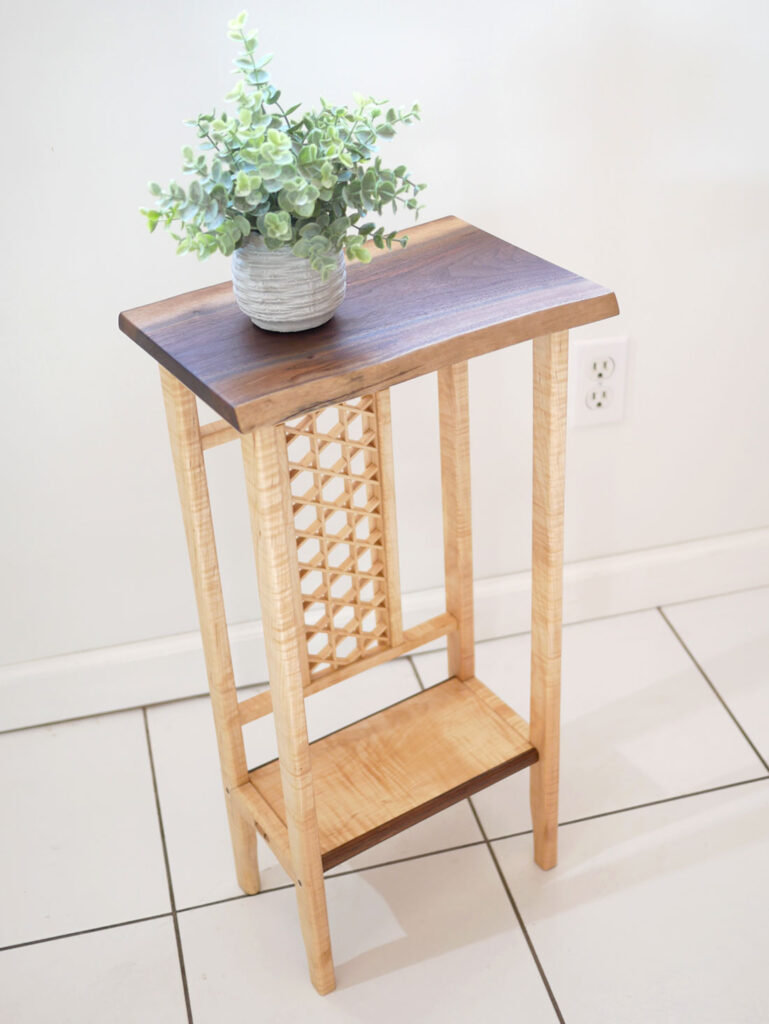
I made a plant stand by utilizing the techniques of haunched tenons/mortises, Kagome Kumiko, live edge epoxy/bow tie inlay, breadboard end joint, and using a spokeshave.
- Tools I used
- Pull Hobby Saw
- Flush Trim Saw
- Regular Saw
- Hand Drill
- Xacto Knife
- Chisels
- Plane
- Spokeshave
- Marking Gauge
On this page, I will share the tips I found during the project. For the steps of how I made it, please watch the video.
My Findings
Lumbers
I used 4ft 1″x8″ maple that was curled a little bit. If you want a figured wood, I recommend you to check out the Homedepot. They might have it mixed in the regular lumber if you are lucky. It’s normal maple price as they do not differentiate curly maple from regular maple like other wood craft shops.

Common Techniques
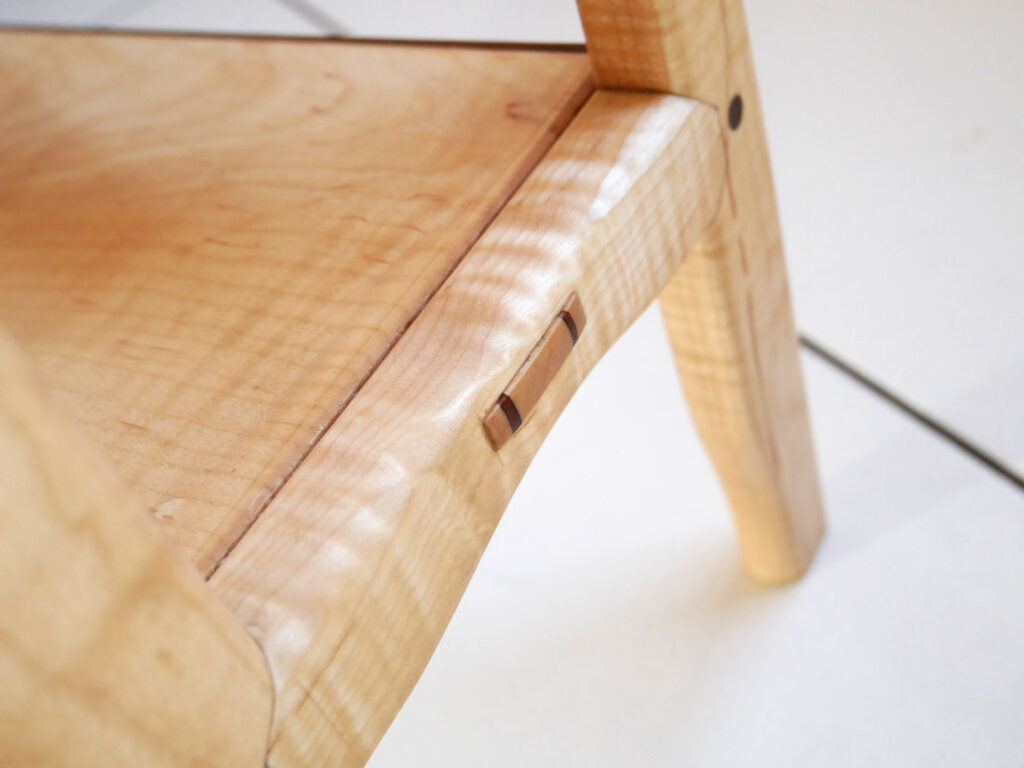
Haunched Tenons/Mortises with Miter Cut
This joint is commonly used for table aprons to legs as it is strong against being twisted yet you can make the top flush. It’s not that different from the regular tenons and mortises and not so much difficult.
However, the miter cut I did on the bottom was a bit tricky. I cut out the strip from a board so it was a little off the square. Please be sure to make the piece square or the miter part may not fit snugly.

Breadboard End Joint
I wanted to learn more techniques for preventing wood from cracking by its movement. The breadboard end joint has lots variations but I just tried a very simple one. The tenon (the shorter & wider one) is total of 1/2″ shorter than its mortise so each side can move 1/4″ while the middle long tenon is wedged to fix the board in place.
It’s my first time doing it and I was trying to find out how I can make it with hand tools so I used a drill and saw to roughly make the shape and used chisels to finalize the shape. Now I want a shoulder plane, a rabbet plane, or a hand router… I think they will make things easier.


Round Off Edges
This was what I really wanted to try! so I bought a round base spokeshave. Basically, I trimmed the wood mostly by a normal flat plane and then rounded off the edges/made curvy lines by this spokeshave.
The angle of the blade was so important and if it doesn’t go well, the blade get stuck on the wood. What I did was I aligned the blade unevenly like the picture and depending on where I shaved, I used the different part of the blade.


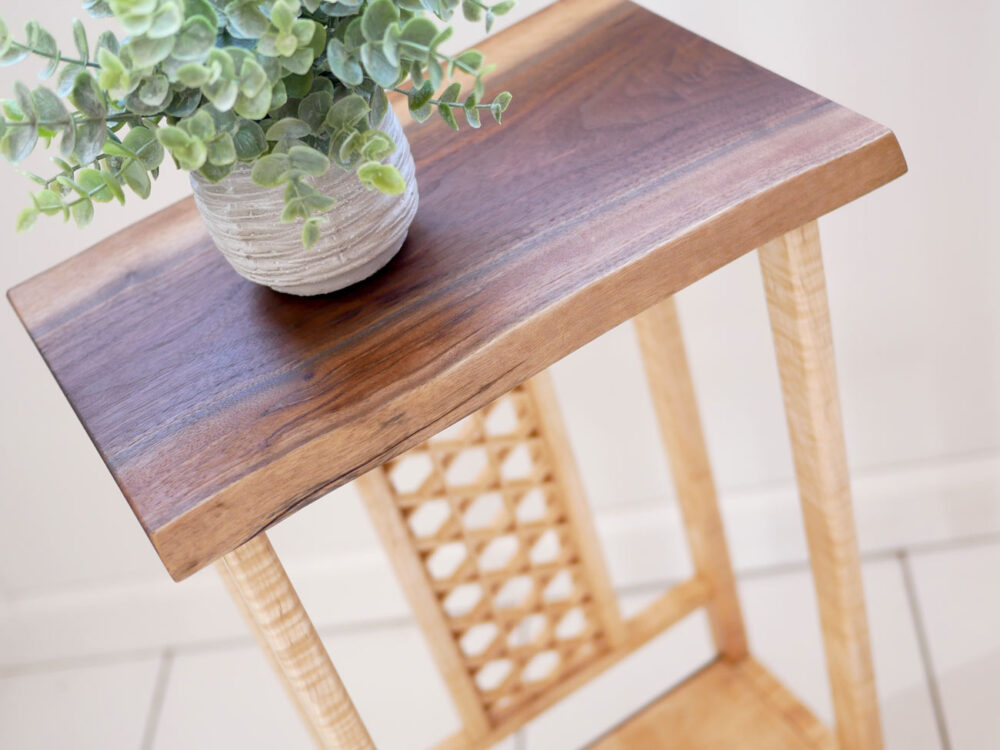
Epoxy on Live Edge
I just used a cheap epoxy on Amazon that was a really good deal, 64oz for only $17! Well, I only used less than 1oz I guess and I put pigment in the epoxy. Even though the epoxy says UV protected, if it gets yellowish by UV later, the pigment can make it not as noticeable.
I also used a heat gun. Originally, I was going to use it to eliminate the bubbles but the epoxy I used was so hard and I ended up heating the epoxy so it gets soft and goes in the tiny cracks.

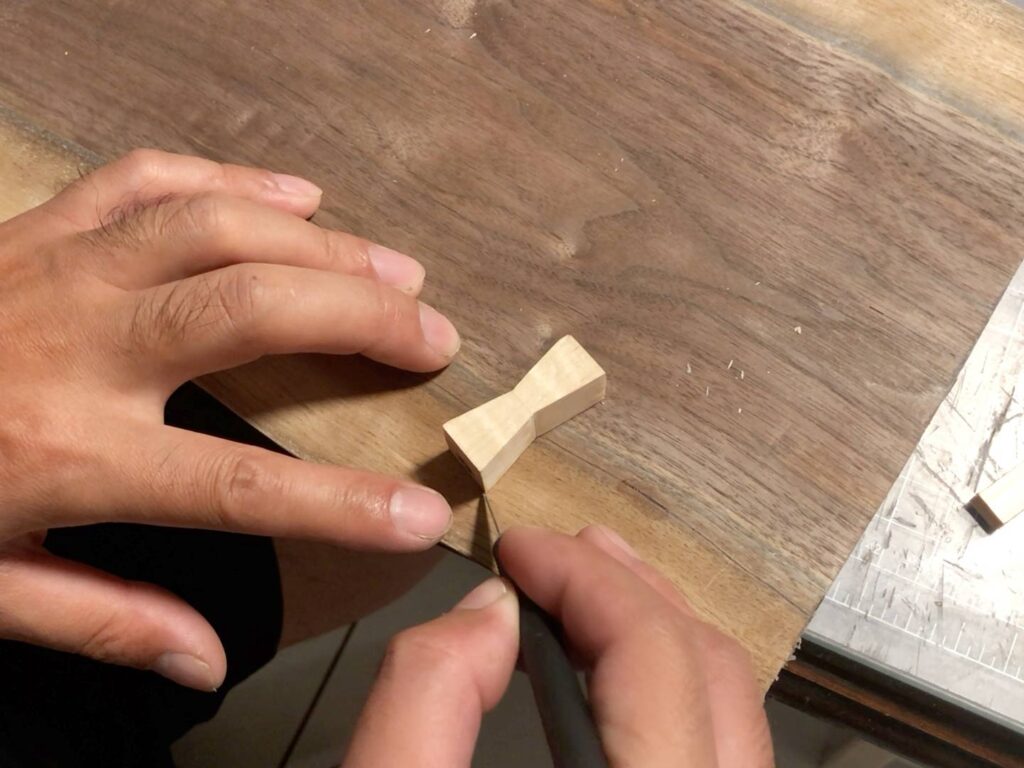
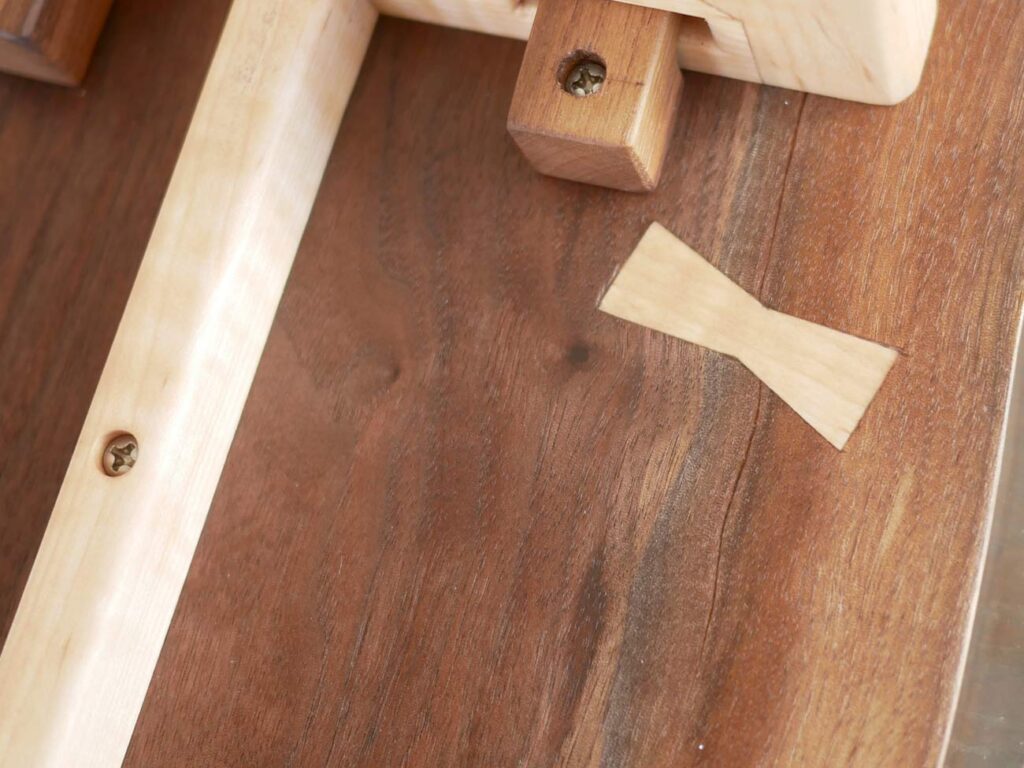
Bow Tie Inlay
The bow tie inlay was much easier than I thought and I didn’t need any new knowledge as far as chiseling a board. Just be sure to mark the bow tie accurately by a knife on the board.
However, to cut out such a small bow tie with a perfect square edge was difficult. For those who don’t have a band saw or a jig saw like me, please take extra time to make a clean square edge bow tie or no matter how accurate you make the mortise, you will see a gap.
Kagome Kumiko
Kagome Variations
I decided to try Kagome(籠目) Kumiko at this time. Kagome Kumiko actually has lots variation but I went with a very basic one. For your information, the variations I know are the following.
- Hon Kagome (本籠目)
- Metsubushi Kagome (目潰し籠目)
- Metsubushi Hon Kagome (目潰し本籠目)
I won’t go into the detail at this time but I will probably try them someday and put them up on YouTube.
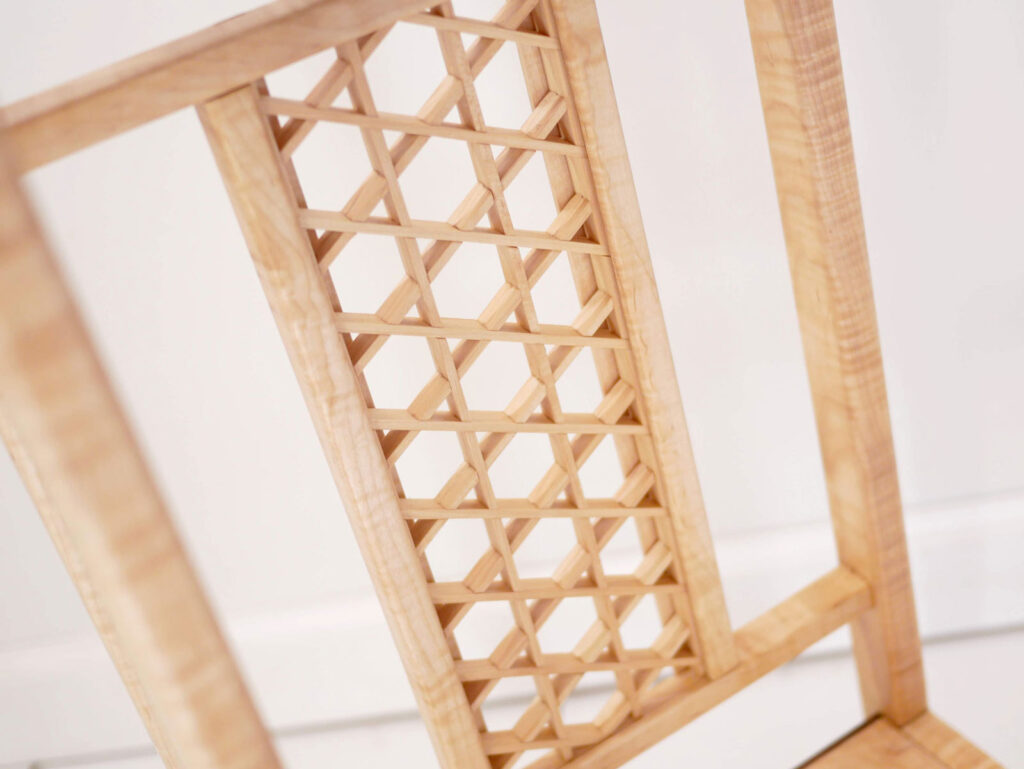
Slot Pattern
As Kagome pattern doesn’t have an intersection where 3 strips meet the cutting was easy.
However, please note Kagome needs way more accuracy than Mitsukude so I think it’s better trying this after you feel comfortable making Mitsukude.
Please find where to cut in the following picture.

Others
Tenon/Mortise
When you do tenons and mortises, of course it’s good to be real precise but, I know it’s difficult so please at least focus on the tenon width that fits the grain direction of a mortise like the picture.

This side has to be accurate or the mortise side of the wood may split or it will be too loose.
On the other hand, the other side can be roughly cut as far as it runs bigger and can fit in the mortise. This side of the grain is so strong. I usually work on this side after the grain direction and shave off little by little to fit it tight and right.

Finish
As I used kind of figured maple, I used wax to make the curl shine! First, I spray water on the stand to raise grain and sand it by 120, 220, and 400 grit. Then, I put mineral oil on it and let it absorb enough oil. At the second coat, I used 600/800 grit and oil sand the surface.
Now, it’s time to use Wax. I used steel wool (#000/#0000) to apply the wax and rub it and wait for few hours to dry. What I did was I basically put wax on a steel wool and go all over the surface. I felt it was just like cleaning something with a sponge and detergent. Though, it left black steel wool dust/residue that looked pretty dirty.
Then, I wipe the excess wax and polished with a clean cloth.
It was actually tough to clean the black residue around the joints so I used a tooth brush and mineral oil to clean and wiped it off.

Table top Joint
I don’t know how it is called but I used the following method to fix the table top. This way, the table top wood can have movement and it’s the one of the easiest way, I think.

Just Try!
I found it’s actually fun to try lots of new things at a time and it’s good for learning something! I mean, if I had messed up one thing in the middle, I wouldn’t have been able to complete this project so there was good amount of pressure that made me be more careful.
Why don’t you try something new!
Product Gallery