I’ve been wanting a router plane and here I finally made my first router plane and it was a simple 10 hour project!
Project Summary
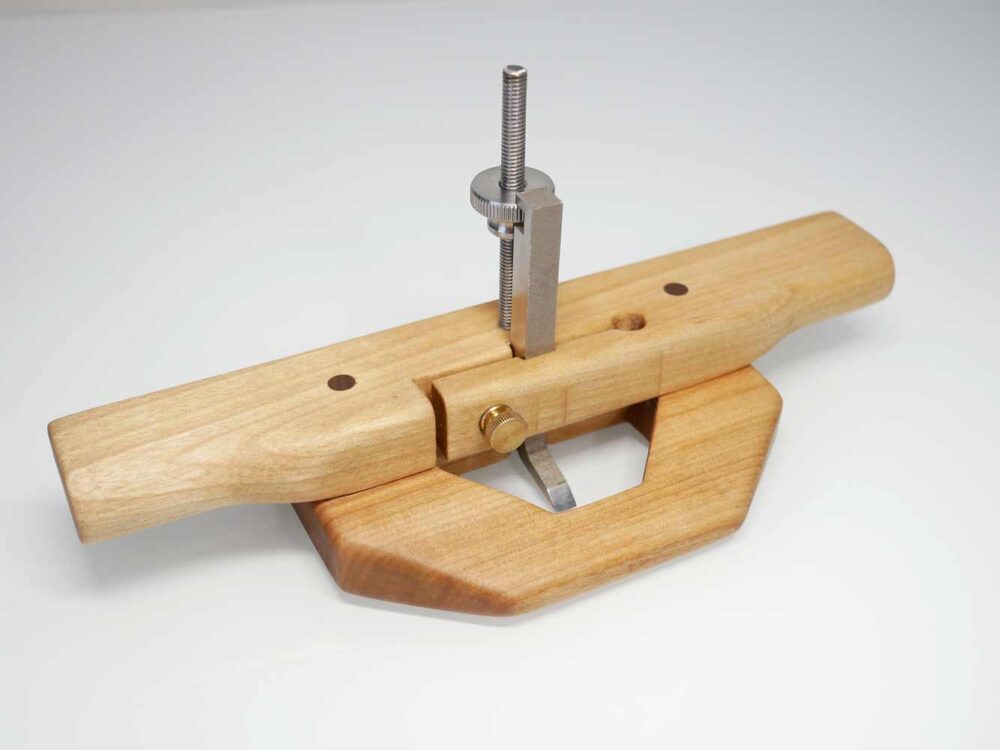
I made a router plane and as it’s also for YouTube, I wanted to make something different from what’s on YouTube already so I tried to create my own style (In that way, I hope someone may come up with something better someday based on my style).
My concerns for the project were as followed:
- No eye bolt to hold the cutter
- A single screw to hold the cutter
- A screw head that doesn’t interrupt the visibility of where I cut
- Tools I used
- Hand Saws
- Hand Drill
- Chisels
- Hand Planes
- Spokeshave
- Marking Gauge
On this page, I will share the tips I found during the project. For the steps of how I made it, please watch the video.
My Findings
Wood Fabrication
Wood Choice
I used birch wood. I was going to use white oak, which is known as a good material for precision tool making but the hardness of the wood was difficult to handle for a beginner like me. Then I just happen to find birch that has a good grain like quoter/lift sawn so I decided to go with it.
I think the grain pattern for the base is as important as wood choice in terms of accuracy by wood movement in the long run.

Coping Saw is Great
To cut out the base, I used a coping saw and it worked amazingly. If you haven’t used it, just get one (IRWIN Tools ProTouch Coping Saw). It’s far more easier than cutting out a large area by chisels.

Things Around the Cutter
Making a Cutter Insert Clamp
For the clamping of the cutter insert, I used #8 threaded insert and knurled nut. As #8 insert nut is made by pretty thin metal, it needed me to be really careful to insert it in the wood. When I tested, I messed up several of them. Therefore, I inserted the nut into the wood before everything else (I didn’t want to mess it up after fabricating the wood piece) to be sure it goes in well to begin with.


Cutter Insert/Slit Size
I originally made a cutter insert 1mm longer than the actual cutter size like the picture below but the birch was a little harder than I expected and it wouldn’t hold the cutter tight unless I tighten the thumb screw really tightly. As this entire fabrication is very simple, you may want to test the clamp function with a scrap piece before working on the actual one.
What I could’ve done is probably to make the slit longer so it can clamp the cutter easier but for me, it was too late.

Brass Insert is Good!
As for cutter insert problem above, I put a brass insert(.032″ brass sheet) in the cutter insert to fill the gap by super glue. This helps me not only to clamp the cutter easier but to insert the cutter smoothly as well as it protects wood from being worn out from friction with the cutter. So this is a good thing to have regardless if the cutter insert was too big or not.

Depth Adjustment
I used M6 stainless steel threaded rod and knurled thumb nut. I simple attached it to the base by 5 mins epoxy. It only goes in a little less then 3/4″ depth.

Difficult Moment
Again, Test It Enough Times
The difficulty I faced during the project was the clamping function. If it were more flexible and can clamp the cutter easily, there weren’t any problems. In my case, like I said it didn’t tighten the cutter well at the beginning so I had to fill the brass sheet.
Then, what happened to me was, as the cutter insert doesn’t have enough leeway anymore, I can not tilt the cutter enough and because of it, the depth adjustment nut wouldn’t fit in to the slot on the cutter like the picture below.
I noticed this before attaching the rod for the depth adjustment so I tilted the rod a little bit back words and made the cutter slot a little wider. Luckily, it worked but again, I should’ve tested it before starting the project.
I’d definitely make a slit longer if I make it again so it can open and close easier.


Misc
Clamping Function
I used #8 brass threaded insert and knurled thumb screw that I bought from the Homedepot and Lowe’s(the threaded insert was sold out at the Homedepot so I went to Lowes).I actually didn’t even know those stores have such hardware but they are even cheaper than ones from Amazon.
As for the sizing, #8 is good but for the durability, I may consider to use #10 for next similar projects.

Depth Adjustment Function
I used M6 threaded rod and knurled nuts from Amazon but after knowing the Homedepot/Lowe’s sell those cheaper, I would go with Homedepot/Lowe’s. Just the thing is, what they sell are not in metric but imperial, which doesn’t really matter to me.
For your reference, if you are not familiar to comparing the sizes between metric and imperial, M6 is very close to 1/4″ so you can get 1/4″ threaded rod and knurled nut in this case.

The Cutter Choice
I didn’t really mind the blade quality at all and I bought cheap 3mm/6mm blades from Amazon. For a noobie like me, it’s much cheaper to buy a blade than making it from a Hex key assuming you have no metal fabrication tools like me.
For the blade size, the reason I chose this set was, I thought I mainly use the router for making a dado fitting for 1/8″ & 1/4″ boards and they are very convenient sizes (3mm is a little less than 1/8″ and 6mm is of course a little less than 1/4″ ).

Just Try!
I’ve hesitated to make tools like this just because I doubted my fabrication accuracy but after making this, I got some confidence that I can make tools and at the same time, I now know I need to plan/test more before doing it.
Anyways, just try it or you never know!